News
DTF Printing for Activewear: 10 Ideas for Fitness and Activewear Brands
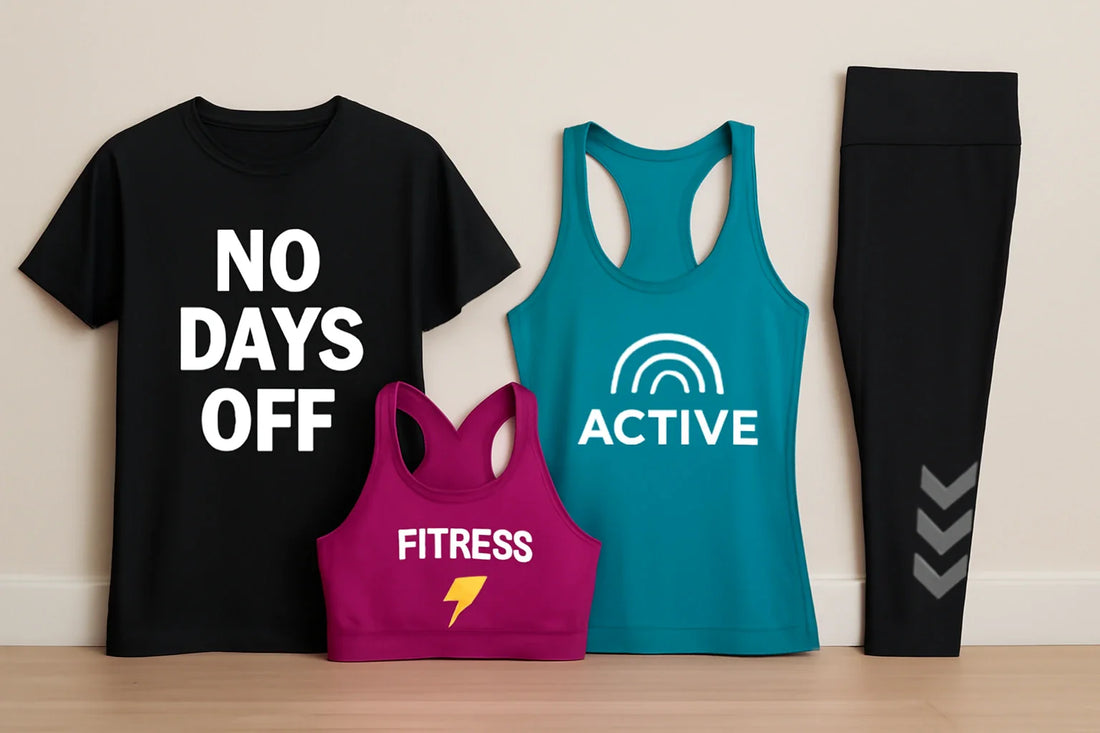
Fitness fashion isn’t just about looking cute while you’re gasping for breath in spin class. Design’s gotta pull its weight. If you’re considering launching an activewear brand (or simply want to revamp your existing line that’s not generating many sales), DTF printing for clothing is the ultimate solution. With DTF printing for activewear, you can test new ideas, scale up or down, and create eye-catching looks for sports brands without burning your budget. Whether you’re creating custom fitness shirts or distributing branded tees at events, DTF is essentially the MVP for high-performance branding. In this post, we’ll discuss the potential of DTF in activewear and explore some creative ways to utilize DTF to make your fitness apparel printing a powerful revenue driver through product drops, giveaways, and innovative ideas that can lead to exponential growth. How to Use DTF Printing for Activewear If you want bold, durable prints for fitness wear—without the hassle of old-school printing—DTF might be precisely what you need. Whether you're adding sleek logos to leggings or going all out with neon graphics on sports bras, DTF gives you vibrant colors that last. It stretches, moves, and survives wash after wash without flaking out. Perfect for if you’re just getting started—or already deep in production mode. So, if you're ready to make your activewear stand out, check out some of these creative ideas to utilize DTF printing for your brand. 1. Motivational Slogan Tees & Tanks Nothing gets people through that last set like “No Days Off” screaming across their chest. Use DTF to add those motivational slogans on tanks, tees, or compression tops. They’ll survive sweat, stretching, and probably the apocalypse. Plus, your brand’s name will be right there, every squat and sprint. 2. Limited Edition Drops Make your line feel exclusive. Drop limited runs—seasonal colors, wild graphics, or collabs that keep your fans chasing that next release. No more warehouse full of unsold stuff. Just press what people want, when they want it. Build hype, create FOMO, and keep your brand buzzing with custom activewear printing that won't break the bank. 3. Performance Line Branding Want to make your collections pop? Go bold with color stories—icy blues for “endurance,” electric stuff for “power,” or chill neutrals for “recovery.” DTF makes it easy to maintain a consistent branding across leggings, tanks, and more. The designs look pro, feel pro, and your brand is instantly recognizable in a sea of lookalikes. 4. Branded Event & Gym Merch Throwing an event or teaming up with a gym? Create custom shirts, towels, or duffel bags featuring your logo prominently. People take them home, use them, and, as a result, help your brand go everywhere—like a global billboard. 5. Influencer Kits: Match Game Strong Want to get noticed on Insta? Send influencers matching sets—leggings, sports bras, crop tops—all with flawless design. It photographs like a dream and gets you tagged all over social media. It’s free advertising with a side of street credit. 6. Reflective or Glow-in-the-Dark Details Let’s take things up a notch. Enhance your activewear line with fun and functional details, such as reflective or glow-in-the-dark DTF elements. Not just for style points, but also for folks out there running after sunset or cycling at dawn. Athletic wear printing solutions that blend fashion and function are one of the best-selling items, so make them your priority. 7. Compression Gear with Layered Graphics If you’re working with compression wear, DTF opens the door to some seriously creative design options. Think of layered graphics, such as muscle contour maps or the high-tech “armor” look that makes your gear stand out. The result? Apparel that looks premium, performs great, and sells even better. DTF makes it easy to get those pro-level finishes, without the headaches that come with outdated printing methods. 8. Branded Tote Bags and Gym Accessories Why stop at shirts and leggings? DTF works just as well on tote bags, zip pouches, sweat towels—pretty much anything your customers use. And once it’s got your branding on it, it’s not just useful, it’s memorable. These make great add-ons, giveaways, or bundled items that add value without much extra effort. Custom gym wear with DTF transfers expands your reach beyond apparel. 9. Loyalty or Subscriber-Only Designs Want to make your die-hard fans feel special? Drop some exclusive DTF designs just for subscribers or your top buyers. It could be a sleek little logo tee or an off-the-wall seasonal print. Doesn’t have to be a big production—small batch is the name of the game here. Think of it like print-on-demand workout gear that earns loyalty. 10. Behind-the-Scenes or BTS Collection People love to see what’s behind the curtain. So, print some behind-the-scenes (BTS) stuff: rough sketches, inside jokes, mission statements, whatever tells your story. Those DTF prints aren’t just merch—they’re like letting your fans backstage. They make you more than just a brand; you become a crew with an actual vibe. That’s how personalized fitness shirts turn into a movement. Why Choose Music City DTF If you're over prints that fade after two washes, our DTF transfers are the upgrade you’ve been looking for. Our products are designed to withstand sweat, stretch, and tumble drying without compromising quality. Whether you're just getting started or scaling quickly, we make it incredibly easy to create custom activewear printing designs that genuinely hit the mark. Ready to build a sports merch? Explore our DTF Sample Pack to discover designs and get started with DTF printing. Final Thoughts: is DTF good for activewear? Short answer? Absolutely. DTF is revolutionizing the printing industry, particularly in emerging sectors such as sportswear and activewear. These niches are booming, and people seem to have an insatiable appetite for custom gear. The best part? It doesn’t take a massive investment to get started. So if you’re looking to turn your creative ideas into real income (not just side projects), getting into DTF for activewear is a smart move that just makes sense. When it comes to the best printing for gym apparel, DTF consistently delivers. So if you're ready to launch or level up, grab those designs and start printing. This is your sign to stop waiting and start making noise.
Learn more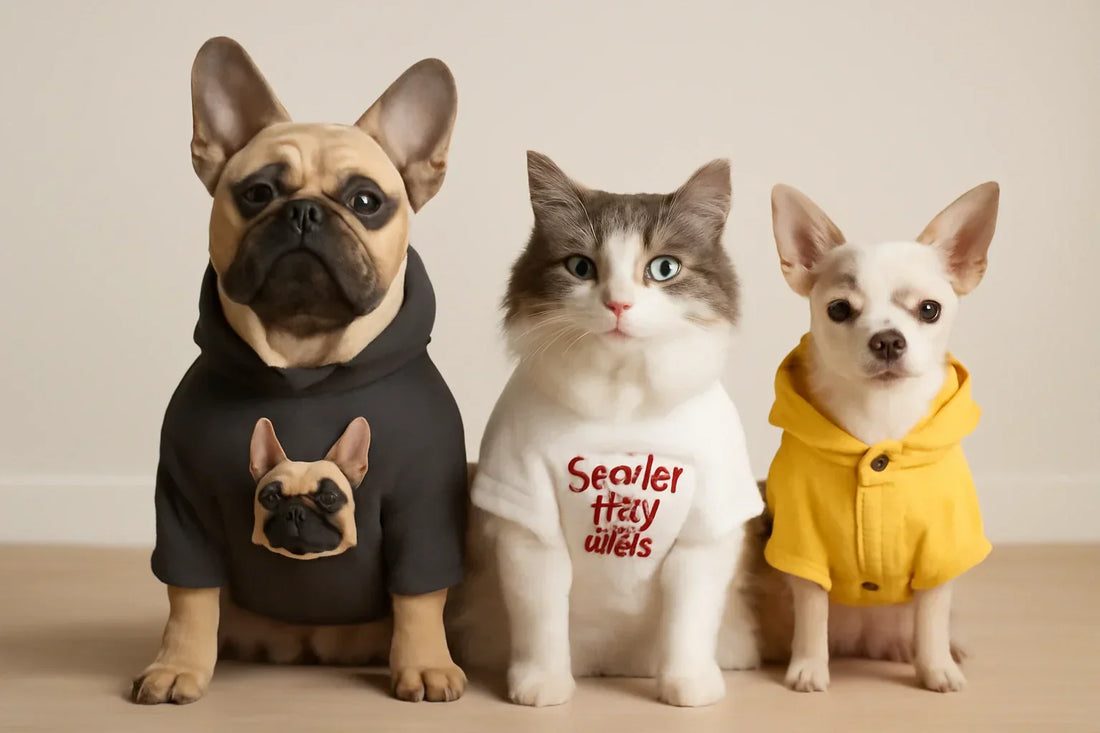
Pet Apparel Printing with DTF: A Growing Trend and How to Tap Into It
The growing trend of pet fashion printing has taken off, and DTF printing for clothing is the reason small businesses are capitalizing on it. Consider this: custom hoodies and pet clothes for French Bulldogs, birthday tees for senior cats, and even tiny raincoats for teacup pups. Pet apparel printing with DTF is more than fashion—it’s an expression of identity for pet owners. And with DTF, the designs are bold, detailed, and durable enough for pets who love to roll in mud and chase squirrels. Whether you’re starting from scratch or adding pet gear to your shop, this trend is worth sinking your paws into. This post explores the potential of the pet DTF market and the fun, functional, and creatively innovative ways to tap into this booming niche. Pet Apparel Printing with DTF to Unlock a Profitable Niche DTF printing isn’t just for humans. It translates beautifully to four-legged wearables as well. High-stretch dog tees, breathable hoodies, and lightweight vests all benefit from vivid colors and strong prints. It’s stylish, personal, and performance-ready—ideal for brands entering pet merchandise printing or expanding their product range. Let’s get into how you can start in this niche and build a profitable business. How to Start a Pet Apparel Business with DTF 1. Breed-Specific Prints Dog people go nuts for anything that screams their pup’s breed. This could be your target audience. Apply an epic illustration or some sassy breed-inspired text on a shirt—pugs, doodles, and greyhounds. DTF nails the crisp details, allowing pet owners to show their love for their animals with custom clothing. It's a winning approach for dog apparel printing, enabling you to test designs for dogs with limited drops and expand to other animals later. 2. Holiday Collections Pet people will buy anything if it has a holiday theme. Halloween bat wings, Valentine’s shirts, Christmas sweaters—and even Fourth of July sunglasses or Easter bunny ears. DTF makes it easy to launch themed pet t-shirt printing projects on demand. You don’t need bulk orders—just fresh ideas and seasonal flair to drive repeat sales. 3. Custom Name Apparel Personalization will never lose its edge. Help your customers apply their pet’s name on a hoodie, tee, or sweatshirt and create highly personalized merch. DTF enables the smooth and efficient production of customized pet clothing that looks sharp and sells quickly. Additionally, it helps you gain loyal customers who will return for more personalized pet apparel. 4. Rescue & Adoption Campaigns Want actually to do some good while selling gear? Create rescue-themed shirts, such as “Adopt Don’t Shop” or “Rescue Crew,” and donate the proceeds to a local shelter. DTF makes those heartfelt messages stand out. It’s not just sales—it’s social proof. Perfect for pet stores diving into custom pet accessories printing as part of a cause. 5. Matching Human + Pet Sets People love matching outfits with their pets. It’s cheesy, but a perfect opportunity for you. Tees, hoodies, bandanas, and custom tees, anything can be turned into a matching set. Perfect for birthday shoots, walks, or just flexing on Instagram. DTF delivers consistent quality from XS bandanas to XXL hoodies, making it ideal for brands expanding into custom pet clothes or coordinated lifestyle gear. 6. Pet Birthday & Milestone Shirts Yes, people throw parties for dogs: “Gotcha Day,” “Puppy’s First Hike,” “Senior Dog Club”—it's all celebrated, giving you the chance to create more and sell more. These moments are ripe for custom dog t-shirts using DTF, because you can print one-offs quickly without wasting materials. DTF’s durability ensures that each design is photo-ready and shop-worthy for such events. 7. Influencer & Petfluencer Merch Pets with social followings are serious businesses. Partner with them for drops—logo tees, catchphrases, cartoon portraits. Great for pet merchandise printing because you can test niche designs in small batches. Additionally, fans adore anything associated with their favorite furry celebrity. It's a high-loyalty, high-impact niche. 8. Event or Expo Merchandise Got a booth at a pet expo? Utilize DTF to create location-based or event-themed merchandise. With a reliable supplier, you can achieve a fast turnaround and high-quality prints with minimal inventory risk. Follow pet fashion trends and create “limited edition” or “one weekend only” items for events to generate quick revenue. Add names or custom graphics onsite for even more value. 9. Rain Gear or Functional Apparel Raincoats, vests, even paw protectors—people want functional clothing that's also cute. Add prints and branding with DTF, and give your audience a blend of practical and premium. DTF is the best printing method for pet apparel that requires stretch, water resistance, or unique textures, as it holds strong without compromising comfort. 10. Eco-Friendly Pet Fashion The modern pet parent wants to shop responsibly. Use bamboo, recycled poly, or organic cotton and finish with eco-safe DTF prints. You’re not just selling a shirt—you’re selling values. As a bonus, sustainability plays a significant role in custom pet accessories printing when you expand into leashes, bags, or toys. Why Choose Music City DTF Want prints that can resist dog parks, slobber, and machine washing? Music City DTF brings the quality your customers deserve. Our transfers are sharp, long-lasting, and pet-proof. Whether you're printing 10 or 1,000, we’ve got the quality you need to build a brand that barks (or meows). Check out our Gang Sheet Builder to get started with pet apparel printing that delivers. Final Thoughts Pet apparel printing with DTF isn’t just a trend—it’s a movement. With DTF printing, you can launch a new brand, scale an existing one, or turn viral pet content into real revenue. Just bring creativity, a bit of hustle, and the right printing partner. Let Music City DTF help you fetch success—one shirt at a time.
Learn more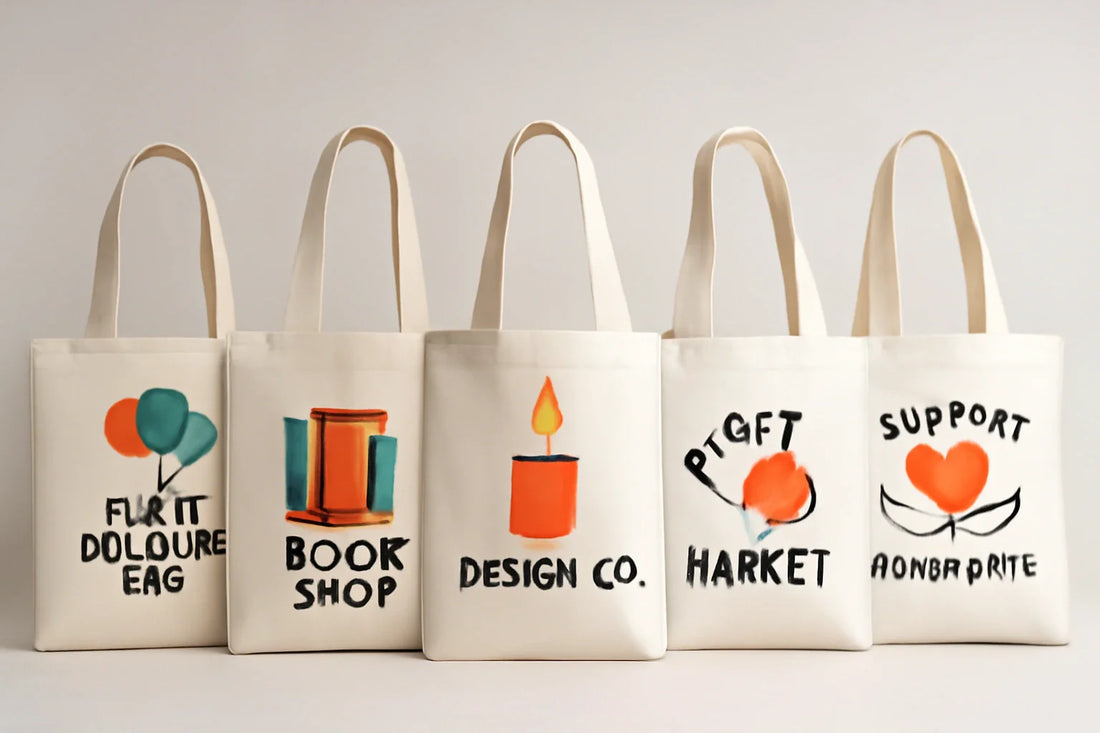
Custom Tote Bags: 6 Ideas for Small Businesses and Events
Custom tote bags are the latest milestone in the evolution of carryalls —probably the most significant upgrade since backpacks went mainstream. They’re casual, sturdy, smaller yet spacious, and somehow manage to work for everything from market picks to office supplies. In a world where everyone’s juggling errands, the tote just makes sense in terms of both style and functionality. Whether you’re hustling with a tiny startup, hyping a new product, or just throwing a local bash, custom tote bags for businesses are like walking billboards that people WANT to carry. In this post, we'll break down six slick ideas to help you boost engagement, win some loyalty, and squeeze every drop of value out of this handy marketing hack. Swag bags, trade show freebies, client gifts, and much more. Here’s how to tote-ally crush your promo game. Custom Tote Bags Ideas Work (And Aren’t Just Another Freebie) Personalized tote bags aren’t just cheap promo giveaways. They’re sneaky little marketing ninjas. First off, they don’t cost a fortune, so you can order a boatload and still stay within your budget. Plus, you can apply any design to get people's attention. Since people use them, unlike business cards and flyers, a tote ensures that your message gets out there, loud and clear. A tote gets carried to the grocery store, gym, library, and almost anywhere in the world, essentially taking your brand with it. The more people see your brand, the more likely you are to gain a customer. Additionally, using reusable tote bags with your logo and brand designs allows you to establish your brand as an eco-conscious entity that aligns with modern values. So ready for some ideas? Here’s how you can use printed tote bags for small businesses to attract new customers and keep the regulars happy, all while making your brand look sharp. 1. Event Welcome Bags That Don’t Disappoint First impressions matter. So, hand out custom tote bags as welcome gifts at your event. Conferences, weddings, graduation events, and community gatherings could all benefit from tote bags. People love personalized totes for wedding and corporate events, especially when they are free. Tote bag giveaway ideas for events don’t have to be boring—go with style and function in one. Fill the bag with schedules, badges, promo goodies, or snacks. They keep your event tidy and turn everyone into a mobile ad for your brand. Additionally, people will continue to use that tote long after the event, ensuring your logo remains visible. 2. Branded Merch for Small Shops Running a boutique, indie bookshop, or that cozy little eco-store? Promotional tote bags are a no-brainer move. Offer them for free with purchases over a certain amount, or just sell them outright. Make the design stand out with quirky quotes, bold colors, and trend-setting phrases and images that people will love to carry. People love a bag they can reuse, and every time it’s out, your brand gets a little boost. If you’re considering tote bag printing, choose designs that match your audience’s style. 3. Client Gifts That Don’t Feel Lame Service businesses—real estate agents, designers, consultants, architects—you want to stand out? Ditch the standard thank-you cards and send a legit gift. Fill a custom tote with cool stuff: maybe a candle, a fancy notebook, or a solid gift card. A tote can be incredibly personal, way more memorable, and every time your customer grabs that bag, they think of you (and your brand). It’s the kind of small gesture that keeps clients coming back. If you're wondering how to design tote bags for business promotions, think usefulness first, and aesthetics second—but don’t skip either. 4. Giveaways at Markets and Trade Shows Let’s be honest, most trade show freebies are not enticing enough to stay with people. But not the totes. Print your logo, your brand slogan, maybe your Insta handle—then hand them out like candy. People will use them to carry stuff during and after the show, helping your brand get the hype it deserves. Plus, unlike flyers or pens, a tote doesn’t end up in the trash five minutes later. Your brand sticks around, getting eyeballs long after the event wraps up. If you're a new brand, use custom DTF tote bags for small brands to start building a buzz. 5. Custom Packaging for E-Commerce Orders If you’re still using boring brown boxes for orders, you’re missing out. Why not apply your branding to a slick tote bag instead? It’s memorable, reusable, and way cooler than a plain old box or conventional packaging. Imagine your customer’s face when they crack open their order and there’s a custom tote staring back at them. Insta-worthy? Absolutely. Free marketing? Most certainly—because they’ll probably carry it around, snap a picture for their feed, or even hand it off to a friend. Custom tote bags for events don’t have to stop at the event—make them part of your shipping experience. 6. Fundraisers and Nonprofit Campaigns For nonprofits, tote bags are cheat codes. Sell them to raise cash, or hand them out as a thank-you when someone donates. People appreciate and support merch that supports a cause, especially if it looks good. A killer design gets people talking, sparks conversations about your mission, and spreads your message wherever that bag goes. You’re building hype, raising money, and getting your name out there—all wrapped up in one handy tote. Music City DTF – Your Ultimate Partner for Tote Printing If you want your totes to turn heads, don’t mess around—go with Music City DTF. Our DTF transfers are vibrant and made to last. These aren’t designs that fade after two washes; we’re talking color that stays on even after a million grocery runs and wash cycles. With quality that promises longevity, your brand’s message will continue attracting customers long after your marketing campaign is over. Ready to try some designs? Explore our DTF Sample Pack and discover designs for your next tote project. Final Thoughts Custom tote bags are the authentic MVP. Affordable to produce, easily customizable, and widely used. Whether you’re running a booth, thanking a customer, or just want people to remember your brand, a solid tote does the trick. Get the design right, work with a pro DTF printing expert, and watch your bags turn shoppers into walking billboards.
Learn more
DTF Printing Mistakes to Avoid: From Setup to Final Press
Direct-to-film (DTF) printing produces strong, vivid results, but only if everything is done right. Success demands more than just nice equipment or basic know-how. Every step counts, from the moment you prepare your printer to the final heat press. DTF printing mistakes, such as poor prints and excessive waste, may result from errors in software installation, print environment, film handling, curing, and even the pressing approach. Often, beginners jump in without appreciating the importance of details such as temperature, humidity, and regular maintenance. And experienced professionals sometimes overlook how quality is affected by changes in their workspace or workflow. Highlighting the most typical errors and how to prevent them—including DTF powder curing issues, DTF transfer errors, and DTF print not sticking—this post guides you through every stage of the DTF process, before, during, and after setup. Knowing what to look for helps ensure your production is smooth and your results are always professional, whether you're launching a new business or adjusting your existing processes. So let’s dive in! DTF Printing Mistakes Before Setup: Controlling the Environment Poor Environmental Control How to prevent DTF transfer mistakes every time? Start with your environment. The DTF process starts way before you hit “print.” It begins in your workstation. If the room is chilly, the prints become all warped and uneven. If the humidity is high, the adhesive powder becomes clumpy, making it challenging to apply. Stable temperatures and humidity prevent problems before they even start. Even the fanciest gear can’t save you from an unoptimized workspace, so treat your room like it’s part of the squad—it’s more important than any other aspect of the process. Poor Film Storage Film is your blank slate, and if you store it wrong, you have failed before you even get started. Remember to stack it flat and keep it in a cool, dry place—away from sunlight, vents, and humidity. Warped or curled film can jam up your printer and mess with the ink. Doesn’t matter if your printer’s dialed in—bad film ruins everything. Additionally, add dates to your film packs and use the oldest items first. Maintain your film as much as your printer, because without it, even the most brilliant artwork won’t save your final output. Mistakes During Setup: Preparing to Print Incorrect Print Settings Once your room’s environment is sorted, focus on your software. One wrong RIP tweak—bad resolution, lame color, too much or too little white ink—and your prints will come out inconsistent: fuzzy, dull, or barely there. Forget the default settings—test stuff for your specific inks, film, and shirts. Calibrate, take notes, tweak again. Yes, it takes some time, but if you want colors to pop on your shirts and details to stay sharp, you have to configure the setup from the start. Best practices for DTF transfer printing always begin with the correct settings. Great prints aren’t lucky—they’re a result of accuracy and consistency throughout the process. Neglecting Printer Maintenance Clogged nozzles, dusty caps, and dried-up ink—any of these issues can bring your printing to a halt. Make nozzle checks and cleanings a daily thing, and don’t skip scheduled flushes. Little cleaning habits will save you money and headaches. DTF printer maintenance tips are essential for achieving consistent quality and minimizing frustration. And they are not some hard and fast rules, simply maintain your printer every week to find little issues before they become significant problems. Mistakes After Setup: Printing, Curing, and Pressing Improper Curing Technique Curing’s where you lock that print in, and honestly, it’s where a ton of DTF enthusiasts mess up. If your powder is under-cured, the design will peel. Go too far, and it’ll be stiff or crack. Therefore, ensure you use an infrared thermometer to verify that your oven is set to 320°F. No guessing. Consistent heat and airflow are everything. How to fix peeling DTF transfers often comes down to proper curing. Peeling and Transfer Mistakes Even when prints look fine out of the oven, they can fail during pressing or after washing. What causes DTF prints to peel off usually boils down to pressure issues, bad timing, or surface contamination. To fix this, there are a few heat press mistakes to avoid, including uneven pressure, too low temperature, or skipping the post-press step. These little oversights are the ones that’ll haunt your final product. Smart Workflow Habits Following DTF printing do’s and don’ts keeps your workflow streamlined and your results as expected. Regardless of the number of shirts you are printing —ten or a hundred —having a checklist and monitoring variables ensures you don’t waste time or supplies. How to get clean results with DTF transfers isn’t magic—it’s about discipline and repeating what works. Document what settings work and stick with them. Why Choose Music City DTF From initial setup to the last press, Music City DTF helps streamline your entire printing process. To help you prevent expensive errors, we provide excellent inks, films, powders, and expert guidance. We are here to help you get it right the first time, every time, with quick delivery, dependable products, and a team that knows the whole DTF process. Final Thoughts Success in DTF printing is built on consistency, care, and attention to each step—from setup to the final press. Avoiding these common DTF printing mistakes helps you produce better work, save materials, and reduce stress. Stay informed, be proactive, and partner with the right suppliers. With the right approach, every print can reflect your skill and professionalism, helping you attract more customers. Ready to work on your first print? Try our DTF Sample Pack and see how our DTF transfers look on your merchandise before you make a bulk purchase.
Learn more
DTF Color Mismatch: Why Your DTF Colors Don’t Match Your Screen — Color Correction Tips
Among the most aggravating issues DTF print shops experience is DTF color mismatch. You work for hours crafting the ideal artwork only to find out later that it looks muted, off-hue, or just inconsistent with the original. From screen calibration and application settings to ink and curing techniques, DTF printer color management almost always underlies the problem. Understanding how DTF color correction works can save you hours of wasted time, film, and materials, whether you're new to direct-to-film printing or looking to enhance your method. This guide clarifies, in a step-by-step manner, exactly why your colors might not match and how to resolve the issue. To achieve prints that look as excellent on fabric as they do on your screen, we will review the most common causes and remedies for DTF transfer color problems. DTF Color Mismatch: Problems to Consider 1. Your Monitor Isn’t Calibrated Your DTF print looks different from the design? It could be the monitor. If your monitor isn’t calibrated, you’re essentially setting yourself up for failure right from the start. Every screen’s got its weird quirks—one’s too blue, another’s got the brightness that is too much. You have to use a colorimeter and actually calibrate the device. Set it to sRGB or Adobe RGB and adjust the brightness and white point until the image appears as desired. This is the foundation of color calibration for DTF printing. 2. You’re Not Using an ICC Profile No ICC profile? You’re essentially playing color roulette and hoping that your printer, ink, film, and RIP all work together seamlessly. Spoiler: they won’t. That’s how you end up with colors that are either too bright or too dull. An ICC profile is a data file that specifies exactly how colors are intended to appear when printing, provided you’re using that particular setup. Always obtain the ICC profile from your ink or film supplier, or create a custom one if possible. It’s not optional if you want your DTF colors to match screen output. 3. Your RIP Settings Are Off RIP software is the translator between your beautiful digital art and what comes out of your printer. If your settings are even a smidge off—white ink too heavy, color channels swapped, or poor resolution, your print is going to look off. Don’t trust the defaults. Run some tests, adjust the settings, and determine the optimal color settings for DTF printing that work best with your setup. One tiny tweak can be the difference between “wow!” and “yikes.” RIP settings are where the magic (or disaster) happens. 4. You're Using the Wrong Ink or Film Combo One of the primary reasons why DTF colors look dull is the quality of the ink. Not all inks and films are compatible with each other. Maybe your cyan is a little off, or the film coating melts weird under heat—suddenly, your colors are all over the place. Additionally, cheap films either ruin your colors entirely or become distorted in the heat. Stick to one brand if possible, and ensure your ICC profiles match. 5. Your Print Environment Isn’t Stable Have you ever tried printing when it’s super humid? Powders and inks don’t cure properly. Even how your film dries can change the color. Try to maintain a print room temperature of around 70–75°F and a humidity level of 45–60%. If your prints look different every day, your environment is likely inconsistent. Don’t blame the printer—blame the weather. This helps eliminate the screen vs print color difference caused by environmental changes. 6. You’re Over or Under Curing Curing isn’t just about making the powder stick. Too little heat and your print looks faded. Too much and you’ll get weird yellowing, especially in whites and pastels. Grab an infrared thermometer and check if your press is hitting the right temp—usually 320°F, give or take. Proper curing is essential for DTF color accuracy. Follow the powder manufacturer’s instructions instead of just guessing. Proper curing = colors that last. 7. File Format and Color Mode Problems Designing in the wrong color mode can also lead to DTF color mismatch. Always work in RGB, but remember: your RIP will convert it to CMYK or any other color space your printer uses. Use Photoshop or Illustrator to soft-proof in CMYK if you want to see how it’ll print. Save your files as TIFF or PNG—JPEGs just mess up gradients and fine lines. Adjusting colors in DTF begins with selecting the correct mode and format from the outset. 8. You’re Ignoring Test Prints Skipping test prints? That’s a rookie move. Do a quick 4x4” swatch before you waste a roll of film and fifty-dollar ink. Compare it to your screen, note what’s off, tweak, repeat. Yes, it’s a bit extra work, but it’ll save you from having to discard an entire batch. This step is key when learning how to fix DTF color issues and avoid waste. 9. Your Art Has Too Much Saturation or Contrast Sometimes, your printer isn't the problem—it’s your artwork. Some designs look fantastic on a backlit screen, but printers just can’t handle that much color. Neon, ultra-black, and other intense colors usually become a mess. Dial it back a bit, consider print design, and select colors that your printer can reproduce. Keeping saturation in check can prevent many DTF transfer color problems. Why Choose Music City DTF? If you’re after color accuracy and solid prints, Music City DTF is the way to go. We’ve got top-notch inks, films, powders, and everything in between. Starting or scaling up? Doesn’t matter. Our crew’s got your back, and shipping’s fast: reliable gear, real support, and no delays. Try our color chart today to start creating prints that accurately represent your artwork. Final Thoughts Let’s be real: dialing in DTF color isn’t magic—it’s a grind. You have to tweak, test, and use the right stuff. From screen calibration to getting the cure just right, every little bit counts. Skip the guesswork, lock in a process, and you’ll get eye-catching prints that look exactly how you imagined. To avoid DTF color mismatch, it's essential to make a deliberate effort to calibrate your monitor, configure your setup, and select colors that are compatible with your printer. When everything is done correctly, you will never mix up colors again!
Learn more
DTF Printing Temperature Settings: How Humidity and Temperature Affect Results
DTF printing can be excellent—those bold colors, crispy lines, the whole nine yards. However, your setup must be perfect; otherwise, you’re just asking for trouble. People spend hours finding the ideal ink or tweaking printer settings, but honestly? There’s a sneaky little troublemaker nobody wants to talk about: the room you’re printing in. The temperature and humidity can lead to warped film, ink spitting everywhere, powder refusing to melt, clingy static, or washed-out prints. In this post, we’ll discuss what doesn't work in terms of DTF printing temperature settings and how to avoid quality issues. Most DTF disasters—powder not curing, white ink turning into cottage cheese, colors looking dull—trace back to the room. So, let’s break down how temp and humidity mess with your DTF game, and what you can do before you rage-quit your next print run. Key Considerations for DTF Printing Temperature Settings 1. DTF Printer Room Temperature: The Silent Wrecker Your printer’s picky about temp. It prefers a steady temperature, like 68–77°F (or 20–25°C). In a cold workspace, ink turns into sludge and clogs print heads. Too hot? Ink runs thin, colors bleed, and images shift. And if your room swings from cold to hot, your nozzles can produce irregular prints in every press. The DTF printer room temperature should never be a guessing game—consistency keeps your prints tight. 2. Humidity: Ink’s Frenemy Too much humidity in the room won’t let ink dry—it smudges, it bleeds, it ruins your prints. Too little moisture, on the other hand, and your ink can dry mid-air, clogging everything up. Either way, your print bears no resemblance to its original design. Humidity effects on DTF printing are no joke; you can waste both time and money. Try to maintain humidity levels between 40% and 60% by using a humidifier or a spray. 3. Powder + Moisture = Bad News DTF powder should be stored in a dry location. High humidity turns it into a clumpy mess that won’t cure right. That’s how you get brittle prints or those patchy transfers. If you’re dealing with moisture problems in DTF printing, store your powder sealed, and if your location is muggy, get a dehumidifier as soon as possible. Otherwise, you’ll be tossing more than you keep. 4. Storing Your DTF Film Too much humidity can cause the DTF film to curl or warp, jam up your printer, or collect dust, which can not only clog the print heads but also end up in the prints. The proper storage temperature for DTF films is cool and dry, with minimal moisture. DTF films can expire, so ensure that their storage is your top priority during the printing process. 5. Static Cling: The Dry Air Menace When your room’s dry, static takes over. Your film turns into a lint collector or shifts when you try to peel it. Result: ghosting, ugly textures, and inconsistent design. Most DTF print quality issues linked to ghosting can be attributed to inadequate humidity control. Always use anti-static spray before you start. 6. Powder Curing If your oven or heat press can’t hold a steady temp, it’s time to take action. Under-cured powder flakes right off, over-cured film warps too quickly. You want a temperature between 250–265°F (120–130°C) for 2–3 minutes, with no variation. Heat press temperature fluctuations are a hidden killer—invest in a laser thermometer that’ll tell you the exact temperature. It’s worth it. 7. Heat Press Pressure & Room Temp The temperature of your workspace matters more than you might think. If the room is cold, your garments stay cold too, and when they hit the heat press, they absorb a lot of that heat, throwing off the balance. Maintaining a consistent, moderate room temperature can significantly impact the quality of your work. Therefore, pay close attention to temperature and humidity in heat pressing. 8. Store Your Stuff Like It Matters Remember that your ink, film, and powder aren’t just miscellaneous supplies to be stored away like old holiday decorations. Exposing them to extreme temperatures—such as the heat of an attic or the cold of a shed—can compromise their quality. Avoid DTF transfer warping by treating your supplies with the care and attention they deserve. Controlled climate, always. 9. When the Weather Flips, So Does Your Print Game DTF printing environment conditions are seasonal. Temperature and humidity shifts can throw things off more than you’d expect. A simple, budget-friendly hygrometer and thermometer can help you monitor your environment on a day-to-day basis. Learning how to control humidity in print shop setups is a long game, but it's your best defense against sudden disasters. 10. Take Notes or Suffer Later Follow DTF printing troubleshooting tips before applying transfers to your merchandise. Tracking your shop’s temperature and humidity every day might not sound exciting, but it’s one of the smartest habits you can build. When a print goes wrong, you’ll have real data to help figure out what happened, instead of just blaming the printer. Why Music City DTF? We get it—print room chaos is a real thing. That’s why our films, powders, and adhesives are built to hold their own, even when your shop conditions aren’t ideal. We don’t just ship supplies—we help you troubleshoot and level up your workflow. Want to see the difference? Get a free sample pack and color chart and start testing print quality today! Final Thoughts The environment matters. Your workspace isn’t just a backdrop—it’s the battleground. Lock in the best temperature for DTF transfers, monitor your humidity, and take your space as seriously as your gear. The best equipment can only do so much if your conditions are inconsistent. Stable DTF printing temperature settings and controlled humidity lead to consistent results, fewer misprints, and way less stress. Therefore, ensure your environment is as well-tuned as the rest of your setup.
Learn more
Troubleshooting Ghosting in DTF Transfers: 8 Things You’re Doing Wrong
DTF printing can be a game-changer for your business when it works as intended. But let’s be real, ghosting in DTF transfers is a nightmare nobody wants. That faint, double image showing up after pressing? It doesn’t just ruin the look—it wastes materials, time, and erodes your professional reputation. One bad print can set you back more than just a few bucks; it can cost you client trust. Fixing a double image in DTF is crucial for anyone aiming for consistent, high-quality results in this line of work. In this post, we'll explore the causes of ghosting—static cling, uneven alignment, and possibly even your press technique—and, more importantly, how to address ghosting in DTF so that your prints appear sharp after each press. Ghosting in DTF Transfers: The Causes and Their Fixes More often, it boils down to a handful of minor but critical issues—maybe the film shifts during pressing, the pressure isn’t quite right, or static electricity gets in the way. But guesswork won’t cut it. The smart move is to isolate each potential problem and address it methodically. Let’s explore the causes of ghosting in DTF and how you can address them. Cause 1: Film Shift During Pressing This one’s the classic culprit. If your transfer film jiggles even slightly while you’re pressing, a shadow can appear. The easy DTF transfer ghosting fix is tape—use heat-resistant tape before pressing. Make sure you’re pressing straight down, and double-check that the film’s lined up. If you’re doing multiples, be extra careful. If your design keeps getting doubles, start here. This is a top priority in any DTF ghosting troubleshooting tips checklist. Cause 2: Inconsistent Pressure Misaligned pressure contributes to both DTF print alignment issues and DTF heat press alignment issues. If the pressure is inconsistent, parts of your design might stick, others might lift, and things just get out of place. Set your press to medium-firm and test it out with some scrap paper or use those little pressure strips. Lay your shirt flat; seams, zippers, or wrinkles can cause the designs to shift, leading to ghosting. Your press platen needs to be level and evenly heated. A crooked press equals a crooked print. Period. Cause 3: Static Electricity This is a lesser-known but serious cause of ghosting in DTF. When the environment is too dry, static builds up and causes your film to cling, snap, or shift the moment you peel it, wrecking your alignment and leaving behind those dreaded shadows. To fix this, try raising your humidity up to around 45–55%. Use anti-static spray on surfaces around your press, especially in winter or dry climates. Managing static is one of the best settings to prevent DTF ghosting. Cause 4: Peeling the Film Too Early If you’re wondering how to avoid DTF ghosting every time, this step is a big one. Patience is key when it comes to avoiding ghosting in DTF transfers. Peel the film off before it’s cooled (for cold peel films), and you’re asking for trouble. Wait until it cools—give it at least 15–30 seconds, or use a fan if you’re in a hurry. For hot peeling, still ensure it’s cured, and peel in one smooth motion. Cause 5: Low Film Quality Low film quality can cause warping, shrinking, and curling, resulting in inconsistent print quality that only adds to your expenses. Bad quality film purchased from unreliable sources can cause DTF print ghosting issues. Stick with solid, trustworthy film providers like Music City DTF. Additionally, store your film in a cool, dry place, away from high heat and moisture. Cause 6: Garment Prep Fails If your shirt is wrinkled, damp, or has debris on its surface, don’t expect miracles. The film won’t stick right, and ghosting will be inevitable. Just take a sec—pre-press for a few seconds, use a lint roller, and smooth out the surface before you start. This is one of the easiest DTF ghosting troubleshooting tips to follow, helping you avoid ghosting and ensure high-quality prints each time. Cause 7: Heat Press Temperature Uneven heat distribution in your heat press can significantly compromise print quality. Some sections of a transfer might adhere perfectly, while others remain undercooked, resulting in visible ghosting or a ghost effect in DTF printing that reflects poorly on your business. To avoid these issues, make it a regular practice to check the accuracy of your heat press with an infrared thermometer (they’re inexpensive and easy to find). It’s also wise to check the press platen by hand for any temperature inconsistencies to avoid ghosting in DTF. Cause 8: Burnt (or Half-Baked) Transfers If you cure your transfers too hot, too cold, or for too long, you’ll get melted messes, lifted edges, or random warps. The optimal temperature range is approximately 250–265°F (120–130°C). You want the finish to be glossy and smooth, not a patchy mess. Also, don’t let the film curl up while curing; keep it flat to prevent hot spots. Finding the best settings to prevent DTF ghosting is non-negotiable if you want pro results. Why Choose Music City DTF? Fixing a double image in DTF doesn’t have to be a guessing game—we’re here to help you nail it. At Music City DTF, we don’t mess around with second-rate stuff. You get top-notch film, glue that sticks, plus real support. No weird ghosting, no ugly smears—just bright, punchy colors that pop. You get fewer screw-ups, and your transfers impress customers who keep coming back for more. Still stressing about your setup? Or would you like to test the goods before making a full commitment? No worries—get our DTF Sample Pack to get started. Final Thoughts For pro-grade designs every time, it is essential to consider all the factors and monitor them closely to avoid wasting time or money. Because ghosting in DTF transfers doesn’t just mess up your designs—it damages your reputation. But now you know how to fix ghosting in DTF. It’s all about locking in your process and setup. If you’re still concerned about DTF transfer printing mistakes, we’ve got your back with all the resources you need. Print sharper, print cleaner, and stress less with our detailed Music City DTF guides.
Learn more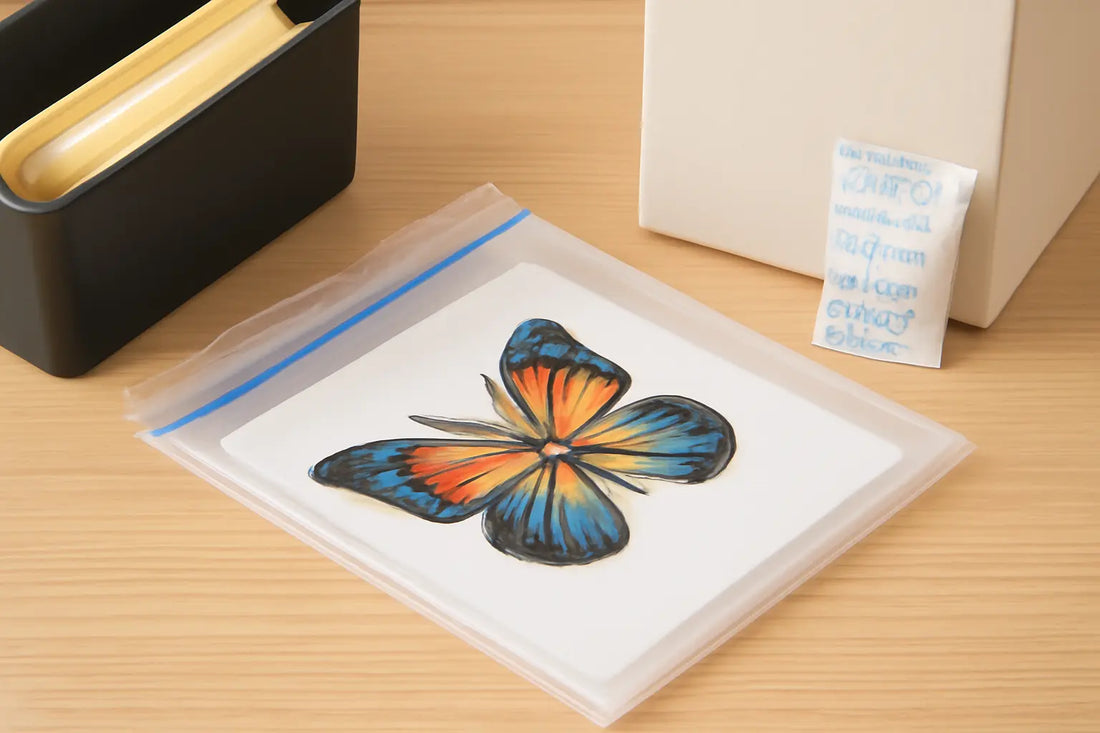
DTF Transfer Storage Tips: How to Handle DTF Transfers Properly
DTF printing can increase profitability for any business, regardless of the type. If you're a brand looking to create a lucrative business, DTF could significantly increase your annual revenue. But here’s the thing—if you’re lazy about storing your transfers before pressing, you’re setting yourself up for a severe loss. Proper DTF transfer storage tips can help you prevent unnecessary loss and ensure that your transfers remain in good condition for an extended period. So, read on to learn how you can prevent inventory loss when using DTF transfers for your merchandise. Top 10 DTF Transfer Storage Tips for Lasting Durability We've rounded up the top 10 storage tips to keep your transfers fresh, bold, and looking like new, even after months. This isn’t just an optional step—think of proper storage as the secret sauce for protecting your hard work and ensuring your finished product wows people. Your reputation depends on this, so let’s not 1. Protect Transfers from Light, Dust, and Air The best way to store DTF transfers is to place each sheet into a plastic sleeve or a resealable bag—using acid-free and archival-grade materials is recommended. If you’re in a humid area, add a silica gel pack to absorb moisture. And avoid PVC plastics—they can mess with your ink over time. Store in opaque folders or envelopes to keep sunlight from fading your colors. Keep DTF transfers dust-free and sealed to avoid scratches and other damage. It takes just five minutes to do, but it’ll save your work. 2. Handle With Clean, Dry Hands Nobody wants a greasy thumbprint ruining their design. Wash and dry your hands before touching the PET film. If you’re handling them a lot, wear cotton or nitrile gloves. Don’t poke the printed side—your fingerprints could mess with adhesion or leave marks. Grab the sheets by the corners, or use tweezers for greater accuracy. These are basic DTF transfer handling instructions—make it a rule in your shop. 3. Label and Date Everything If you don’t label your transfers, you’ll end up forgetting prints at the worst possible moment. Mark the PET backing (not the printed area) with a fine-tip marker or sticker, including the date, design, peel type, and client. Use up your old stock first. Wondering how long do DTF transfers last in storage? A properly stored transfer can last several months, but even the best prints degrade over time. 4. Hands Off Unless You’re Pressing Every time you touch a transfer, there’s a chance of bending, scratching, or smudging. Avoid unnecessary handling. Keep transfers in their protective bags or folders until they’re ready to press. Don’t mix old and new prints. If you’ve got a team, limit who can access it. Less handling means fewer mistakes. This is proper DTF transfer handling 101. 5. Keep Transfers Away From Chemicals DTF film is surprisingly sensitive to its environment. Keep your transfers far from cleaning sprays, ink solvents, and harsh aerosols. Even air fresheners or scented diffusers can mess with your colors or adhesive. Give your DTF stash its zone. Store them in airtight bins with solid lids if they share space with your printer. That’s how you avoid DTF transfer cracking before you ever hit the press. 6. Do a Quick Inspection Before Pressing Have you ever pressed a shirt and then noticed a random crease or scratch on the print? Always check your transfer under a good light before using it. Look for curled corners, visible scratches, or issues with the ink. Confirm whether it’s a hot peel or cold peel, as mixing them up can ruin shirts. These tips for preserving DTF transfers are small habits that go a long way. 7. Practice FIFO—First In, First Out Transfers don’t get better with age. Always use the oldest ones first. Label by date, sort into folders or bins, and consider color-coding if you’ve a large volume. FIFO isn’t just for grocery stores—it’s your best defense against wasted materials. The shelf life of DTF transfers is limited, even when stored properly. Stay organized and cycle through your inventory regularly. 8. Use Storage Systems—Not Piles Don’t let transfers pile up in boxes or loose stacks. All it takes is one misstep to ruin a batch. Invest in shallow drawers, vertical bins, or hanging folders. Label them by size, order, or peel type. This way, you’re not scrambling mid-shift to find a design. Whether it’s a small shop or a large warehouse, how to store heat transfers means storing them flat and protected. 9. Control the Temperature and Humidity Heat and moisture are the ultimate enemies. Store your transfers in a cool, dry space. The ideal temperature should be around 65–75°F. Humidity should sit between 40% and 50%. Excessive heat can warp the film, while excessive moisture can cause the adhesive to fail. If you wouldn’t leave your favorite snacks in that room, don’t leave your transfers there either. That’s the best temperature to store DTF transfers with proper humidity for DTF transfer storage to keep them stable. 10. Give Transfers a Real Home Don’t just toss your transfers into “that one drawer.” Set up a real storage area. Use labeled bins and protective sleeves, spacing them so they don't press into each other. You spent money and time on those prints—they deserve a clean, stable home. Following the manufacturer's DTF transfer handling instructions will keep your shop efficient and your clients impressed. Why Choose Music City DTF? If you want vibrant, durable, and consistent results, Music City DTF is the way to go. We use top-tier inks, adhesive powders, and PET films—no shortcuts. You’ll get fast turnaround times, local Nashville craftsmanship (made in the USA), and responsive customer support. Whether you're working on a single custom tee or a bulk order for retail, Music City DTF delivers quality you can count on. Our products are rigorously tested, ensuring lasting color, sharp detail, and smooth application, making them a top-tier choice for anyone serious about garment printing. Final Thoughts How to handle DTF transfers the right way isn’t optional—it’s essential. These sheets aren’t just a step in the process; they are the product until you press them. So, if you’ve been letting them gather dust, get scratched up, or hang out in a humid corner of your shop, it’s time to upgrade your habits by following the above-mentioned DTF transfer storage tips. Label them, store them flat, check them before use, and stop overhandling. Small moves like this can lead to significant savings—fewer ruined shirts, fewer reprints, and more satisfied customers. From knowing the DTF cold peel time to storing at the best temperature to store DTF transfers, it’s all about treating your prints with the respect they deserve. Ready to start printing? Get started with our DTF sample pack and gang sheet builder to create stunning designs for your merch!
Learn more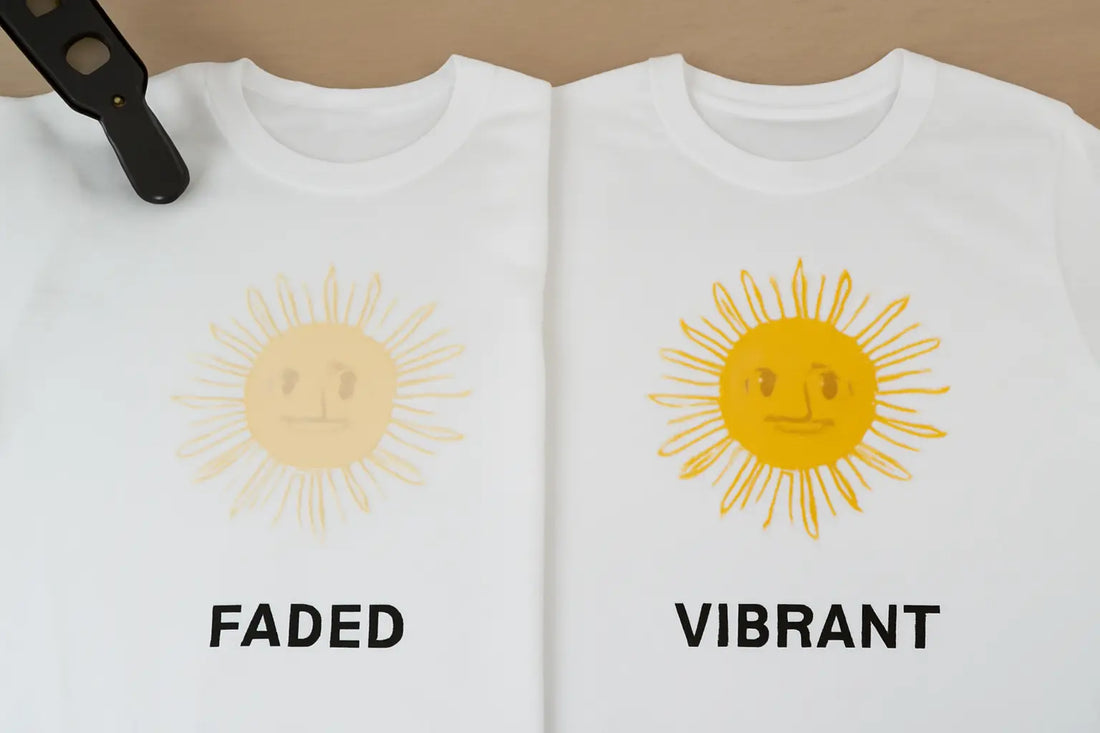
Why Your DTF Prints Are Fading — And How to Prevent It
DTF (Direct-to-Film) printing provides bold colors, fine detail, and fabrication flexibility. But if your tees are already fading after a couple of washes, something’s gone wrong. DTF is powerful—but it’s not bulletproof. From materials to curing, storage to laundry, every step matters. Miss one, and your designs fade faster than your Monday motivation. Let’s walk through the top reasons why your DTF prints are fading and, more importantly, how to prevent DTF fading so your designs stay bold and vibrant. 10 Reasons Why Your DTF Prints Are Fading Faded prints are not just draining your wallet; they’re trashing your reputation and leaving your customers majorly unimpressed. Here are 10 reasons you seriously gotta get your DTF printing game together. 1. Cheap Inks and Low-Grade Materials If you use cheap DTF ink and flimsy PET film, you’re setting yourself up for failure. Weak pigments fade quickly, and poor film tends to melt or wrinkle. Low-end supplies often lack UV resistance or proper bonding. A cheap supply line is a false economy—your prints will wash out or peel. The cure? Invest in quality, made-for-DTF materials. That’s the foundation for avoiding DTF print quality issues. Shop smart, start strong, and protect every future print. 2. Improper Heat Press Settings DTF isn’t "set it and forget it." Get temperature, pressure, or dwell time wrong—even slightly—and you’ll under-cure ink or overheat film. That leads to cracking, peeling, and fading. Don’t just trust your heat press display—verify settings with a laser thermometer. Follow the recommended proper DTF print curing specifications and modify them for hot peel versus cold peel. Consistent testing ensures your process supports vibrant, durable prints, not fast failures. 3. Skipping or Rushing Curing Half-baked transfers lead to half-lived prints. Skip the complete cure step, and your adhesive won’t saturate the ink, so washing starts to peel everything off. Use a proper curing oven or extended press session. Nail the balance: too little and it fades, too much and it becomes brittle. This step addresses issues such as why DTF prints peel or fade, and delivers vibrant designs that last beyond the first wash. 4. Poor Transfer Storage Just because a transfer looks good today doesn’t mean it will tomorrow. Air, heat, light, and humidity degrade the ink and adhesive. To fight this, stash sheets in resealable, acid-free sleeves and opaque folders—best way to store DTF transfers. Store at 65–75°F with moderate humidity. Add silica packs to keep DTF transfers dust-free. Good storage habits also extend the shelf life of DTF transfers, protecting your investment before it even gets pressed. 5. Washing Too Soon or Improper Care Fresh off the press? Relax at least 48 hours before laundering—that’s your window for proper bonding. Use cold water, mild detergent, no bleach or fabric softener. These aggressive products literally eat ink and adhesive. Share DTF wash care tips with your customers, such as washing inside out on gentle cycles. Remember that detergents matter—hand-picking the best way to wash DTF shirts makes all the difference. Teach proper care and you avoid ruined prints, complaints, and returns. 6. Choosing the Wrong Fabric Not every shirt loves DTF. Slick synthetics, stretchy fibers, or coated fabrics resist proper ink bonding. If your prints fade while pressing on these, the wrong blank could be the culprit. Always test on a small swatch. Stick with cotton, poly-cotton blends, or performance tees designed for heat transfers. The right substrate provides a suitable environment for ink and adhesive, drastically reducing fading, peeling, and DTF transfer durability issues. 7. Printing in Dusty or Humid Conditions Dust and moisture sabotage DTF fast. Humidity clumps powder, loosens ink. Dust lands on a wet film and gets locked in place under the heat. Therefore, keep your workspace clean and climate-controlled, aiming for a humidity level of 40–60%. That’s the foundation of a proper DTF maintenance guide. Additionally, remember that an air purifier and dehumidifier can keep prints vibrant. Don’t let your shop conditions be the silent killer of bold, lasting designs. 8. Overstretching or Physical Stress DTF adheres well, but if stretched too far, it cracks. Shirts get worn, washed, and folded, and high-stress zones (like seams) tug prints. Prints that crack or fade in these areas aren’t faulty—they’re overextended. It’s essential to know your fabric’s flexibility. Adjust print sizes and placement accordingly. To improve longevity, reinforce high-stress zones with reduced ink density. Teach buyers simple hygiene: avoid scrubbing on seams, and your designs won’t peel prematurely. 9. Using Expired Transfers Yes, transfers expire. Adhesives lose potency, and ink dulls over time. Even stored well, a sheet older than 6–12 months may underperform. Always mark how long do DTF prints last in your inventory. Use the First-In, First-Out (FIFO) method to prioritize fresh sheets. Spot aging transfers by feel—sticky films? Toss them. This small habit avoids ruined shirts and saves you from having to remake orders mid-production. 10. Not Following Maintenance Best Practices DTF printing isn’t “set it and forget it.” Keep your press clean, calibrate regularly, and update software. Even minor dust or ink buildup can cause inconsistencies in heat or pressure, leading to fading or peeling. Develop a routine that includes daily nozzle checks, press cleanings, and monthly complete calibrations. Include staff training so everyone follows the DTF maintenance guide consistently. A clean, tuned workspace produces prints that are reliable, crisp, and long-lasting—no surprises. Why Choose Music City DTF? Even if you nail every step, your results will only be as good as the transfers you use. That’s why Music City DTF is trusted by pros who demand longevity and consistency. Our materials—pet film, inks, powders—are engineered for fade resistance, reliable adhesion, and high wash durability. Whether you prefer hot peel or cold peel transfers, we’ve got the quality control and production standards to back it up. With Music City DTF, your prints don’t just look sharp—they stay that way. Ready to start creating something amazing? Try our gang sheet builder to upload your designs! Final Thoughts If your DTF prints are fading or peeling before they should, don’t blame magic—blame the process. Cheap supplies, rushed curing, poor storage, or wash abuse are all preventable. Apply these ten fixes, invest in high-quality materials, and establish effective workflows. Your prints will stay bright and bold, wash after wash. And if you’re ready to step up your production game with fade-resistant transfers, look no further than Music City DTF—your partner in print durability.
Learn more
Hot Peel vs. Cold Peel DTF Transfers: What’s the Difference?
DTF printing is changing the way companies print apparel—no question about it. The color pops, the prints last, and you can use it on a wide range of fabrics. However, here’s the catch that often gets overlooked: Hot Peel vs. Cold Peel DTF. Should you opt for a hot peel or a cold peel for your transfers? It may seem minor, but that choice can significantly impact your production speed, the final product’s appearance, and your overall costs. This guide explains the difference between hot and cold peel DTF, weighs pros and cons, and helps you choose the best peel method for DTF based on your workflow. Hot Peel vs. Cold Peel DTF Transfers: The Core Difference The core difference between the two is the time of peeling. It’s all about when you rip the film off after pressing. Hot peel? Yank it off right away, while it’s still sizzling. Cold peel? You let it cool down before peeling. It doesn’t sound like a big deal, but when it comes to print quality, it changes everything: the look, the feel, and the durability of the print. What Exactly is the Hot Peel? Basically, with DTF printing hot peel, you don’t have to wait around. As soon as you lift the heat press, you can peel the PET film off; you're done. These are designed to let you get started quickly, so you can produce shirts and other accessories speedily and sell faster. Advantages of Hot Peel DTF Here’s why hot peel might be the right solution for you: It’s quick and is perfect for mass production. No cooling-off period. Saves serious time. If you’re in a hurry, hot peel’s your best friend. Feels nice, too—usually leaves the print a bit softer. DTF hot peel instructions tip: Use firm pressure, high heat (around 320°F), and peel immediately after pressing. Disadvantages of Hot Peel DTF Here’s why it may not be so great for your project: Timing’s tricky. Peel too soon or too late? You might just mess up your print. You gotta have your heat press game on point. If your temperature or pressure is incorrect, you may experience a loss of print quality. For accurate results, always follow the manufacturer’s DTF hot peel guide and run tests to perfect your workflow. When to Use Cold Peel DTF? Cold peel DTF transfers—basically, you need to let the PET film cool off before peeling it away. No shortcuts here. The design requires a minute (or two) to adhere tightly to the fabric. Advantages of Cold Peel DTF Sticks like glue. The bond is rock-solid, especially when working with thick or bumpy fabrics. The finish is sharp. Think crisp, durable prints that don’t flake off after two washes. Not as fussy. If your press game isn’t 100% perfect, cold peel is a little more forgiving. The cold peel DTF temperature is typically 300°F–315°F, followed by a DTF cold peel time of 30–60 seconds before the peel is applied. Disadvantages of Cold Peel DTF Here are a few disadvantages of cold peel DTF: No instant gratification—if you’re in a rush, a cold peel might test your patience. Sometimes it’s a bit too shiny. That glossy look isn’t for everyone. If you’re after a super-matte finish, hot peel might be a better option. Best Peel Method for DTF So, which peel is the best? Honestly, it’s not a one-size-fits-all thing. It depends on your production needs, the types of fabric, and your clients' expectations. Grab a hot peel if: You’re all about speed. Blink and it’s done. Your fabrics are cotton or poly blends. You don’t need absolute perfection, just want to keep things moving. Go for a cold peel if: Your fabrics are thick and textured, requiring strong adhesion. You want your prints to survive for years to come. You want rich details, color, and extreme accuracy. So, what's the best peel for vibrant DTF results? If sharp color and detail are your priority, cold peel is the solution. But for bulk runs and time savings, hot peel wins. Key Variables to Consider Beyond peel style, your outcome also depends on: Heat and pressure: A few degrees or PSI off can ruin adhesion. Fabric compatibility: Know which materials are good with hot or cold peel. Ink and powder quality: Don’t skimp. Peel technique: It’s a finesse game. Go slow and steady for clean results. Why Choose Music City DTF? Music City DTF is obsessed with quality. Inks, powder, PET film—everything here is from the top shelf. We offer fast turnarounds, custom options (including hot or cold peel), are made in the USA, and have a customer support team that actually answers emails. With rigorous testing for peel reliability, color accuracy, and durability, Music City DTF is the go-to for professionals who want it done right, the first time. Final Thoughts The entire debate surrounding hot peel vs. cold peel DTF transfers comes down to timing, finish, and workflow. Hot peel gives you speed and a soft finish—perfect for fast-paced shops and bulk orders. Cold peel offers durability and detail, ideal for high-end or complex jobs. If you’re serious about quality, performance, and long-term consistency, work with a provider that delivers both options, tested to perfection. Ready to try peels for your fabrics? Check out our DTF Sample Pack to start testing. Whether you’re experimenting with DTF cold peel time or comparing the advantages of hot peel DTF vs. the advantages of cold peel DTF, we’ve got the products and support to help you get started.
Learn more
A DTF Printing Glossary for Beginners in Apparel Printing
Entering Direct-to-Film (DTF) printing can be challenging, but learning the language beforehand streamlines the process. The first step in creating high-quality transfers is understanding the fundamental DTF printing glossary, whether you are making clothes for a brand or an entrepreneur establishing a company. This beginner-friendly DTF printing terminology guide is designed to help you get started quickly. We have organized essential terms into simple-to-navigate categories, allowing you to study effectively and avoid common errors. You'll discover precisely what you need to begin confidently, from design advice and troubleshooting to supplies and equipment. Why Start with a DTF Printing Glossary As a beginner, it's essential to understand DTF printing terms to avoid errors, conserve supplies, and achieve better results. Knowing the DTF language can help you understand processes, equipment, and methods more quickly by breaking down complex technical vocabulary. This guide breaks down DTF printing for beginners, enabling you to start creating professional-grade prints and confidently resolve any problems that may arise during the process. So let’s dive in without further ado! Basic DTF Printing Terms The following DTF printing glossary terms cover the foundational terms in the DTF printing process, helping you get started. Term Definition How to Use/Maintain 1. DTF Printing DTF printing, or Direct-to-Film, is a straightforward approach that involves printing designs directly on film and transferring them to cloth using heat. It is the primary technique employed for custom garment printing without prior treatment—an excellent option for bright, full-color designs. 2. PET Film A heat-resistant plastic sheet, commonly referred to as PET film, forms the foundation for DTF printing equipment. Have it facing the matte side up when printing; this will prevent the ink and powder from being retained while it is being handled. 3. Heat Press Linking printed film to cloth using a controlled temperature and pressure device. The final transfer depends on this; therefore, adjust temperature and pressure based on your fabric and film type. 4. Curing Heating the adhesive powder with heat in the ink. Good curing is essential for longevity and effective transfer; thus, it is crucial. 5. Transfer The process of heat pressing and glue application of the printed design from PET film onto clothes. Use a heat press to transfer the design from the PET film onto the garment. 6. Gang Sheet A technique incorporating multiple designs on one film. Best utilized for mass DTF production, it lowers material loss. 7. Hot Peel Immediately after pressing Hot Peel, you remove the PET film. Fast but requires exact timing for liquid movements. Ideal for fast workflows. Peel gently after removing the heat press. 8. Cold Peel Let the PET film cool before removing it; this enhances adhesion and clarity, particularly for intricate patterns. Peel 15 to 30 seconds after pressing; often, better results are possible. 9. Pre-treatment Pre-treatment refers to the application of a special chemical before the process. Proper pre-treatment is crucial to help the adhesive powder adhere properly. 10. Peel Test A peel test is a quality check that ensures the design has adhered perfectly. Better adherence requires edge lifting; press for a few seconds more, then softly peel a corner to test. Ink & Powder-Related Terms Inks and powders are essential materials for DTF printing. Choosing the right one ensures long-lasting designs. Term Definition How to Use/Maintain 11. DTF Ink Special pigments made just for DTF. Shake the ink bottles before use to prevent pigment from settling. Store away from sunlight. 12. CMYK Cyan, Magenta, Yellow, Black—the classic squad. Essentially, these four inks are your best bet if you want anything even close to decent color on your shirts. CMYK inks should be filled and loaded correctly in the printer. 13. White Ink This is the secret sauce. Lays down a solid white base, allowing colors to show up (especially on black tees). Not suitable for dark shirts. Always start with white, then stack your colors. 14. Adhesive Powder Sprinkle this magic dust on your fresh print, then heat it so it melts and adheres your design directly to the shirt. Always add it carefully without sprinkling too much, which can result in glued prints. 15. Powder Shaker This shakes the powder for you, making it ready to apply. Best suited for mass production. 16. Powder Oven Old-school but reliable. It bakes that powder in, so your design sticks. Perfect for newbies or anyone running a not-so-high-tech setup. 17. Over-Powdering You apply the powder too heavily, resulting in lumpy prints or items peeling off. Dust, then tap off the excess before baking—less is more. 18. Under-Powdering Skimp on powder and your print might flake, peel, or just wash off after one wear. Check for full coverage. Missed a spot? Hit it again. 19. Powder Shelf Life Powders that are past their shelf life may not produce a vibrant result. Keep it airtight after use and discard if the expiry date has passed. 20. Ink Flow This is how smoothly ink runs through your printer. If it’s off, expect streaks, faded colors, or prints that don’t exceed expectations. Show your printer some love—clean it out if you see lines or weird gaps. Printer and Equipment Terms The following terms encompass the hardware and software required for successful DTF printing techniques, from start to finish. Term Definition How to Use/Maintain 21. DTF Printer It’s a printer to apply DTF ink on PET film. Some models even come with built-in white ink channels and a heater. Wipe it down inside and out, keep it dust-free for accurate results. 22. RIP Software This software takes your picture and converts it into a format that your printer can use. It controls aspects such as the amount of ink used, the colors displayed, and the sharpness. Keep your software up to date. Tweak those settings if your prints look wonky or colors are off. 23. Printhead The business end of your printer that ejects the ink. If it gets clogged, your prints may look rough. Clean it every day—no joke. Use the auto-clean feature if you’re lazy, but flush it with cleaner if things get gnarly. 24. Nozzle Check Think of this as a quick test to see if the printhead is doing its job. A destructive pattern means trouble (usually a clog). Run this test before every print session. See gaps or weird lines? Time to clean the printhead—don’t wait. 25. Print Resolution Essentially, the sharpness or crispness of your image. Measured in DPI (dots per inch). More DPI = more detail, but also takes forever to print. Choose your resolution based on what you’re printing—high detail for artwork, and lower for bulk items. Find your sweet spot between quality and speed. 26. Ink Tank The place where your DTF ink hangs out before making its big debut. Most setups utilize refillable tanks to reduce costs. Only fill with the correct ink. Clean out the tanks once a week, shake gently before use (no one likes settled sludge). 27. Head Strike This is where the printhead smacks right into the film—it usually happens if the printhead’s too low or the film’s wrinkled. It can damage your print and your gear. Always set the right head height. Don’t use curled or bent film. 28. Film Feed This is how your PET film moves through the printer. If it’s off, you’ll get smudges, crooked prints, or straight-up jams. Load the film straight and check the rollers. Then, do a test run before proceeding. 29. Maintenance Routine Keeps things running smoothly and saves you from expensive repairs. Create a weekly checklist—clean the printhead, ink lines, sensors, and the entire system. Back up your printer settings just in case. 30. Heating Platform Some printers have a warm-up feature to dry the ink a bit before you apply the powder. Helps stop smears and makes the powder stick better. Maintain a reasonable level of heat. Use an infrared thermometer if you want to be extra cautious. Design & Output Terms In this section, we will cover terms that are crucial for a successful DTF transfer process, from creating to finalizing your DTF designs. Term Definition How to Use/Maintain 31. Ghosting This is the faint double image after pressing, like a shadow. Usually happens when the film slides around during the heat press. Just tape the film down tight so it doesn’t move during the process. 32. Cracking Usually, it means your powder didn’t cure properly, or the powder itself was of poor quality. Stick with steady heat and time. 33. Peeling When your design starts lifting off the shirt—that’s peeling. Uneven pressure, excessive or insufficient powder, or inadequate pressing time can all disrupt the process. Make sure the pressure’s even and you’re pressing long enough. Don’t rush it. 34. Staining Random weird colors or splotches on the fabric after pressing. It could be a dirty film, the heat cranked up too high, or just the ink going wild. Keep your film clean and control the heat. 35. Banding Those horizontal lines across a print? Classic banding. It’s what you get when the nozzles are clogged or your printer settings are whack. Run a nozzle check and adjust your settings as needed. Don’t just hope for the best. 36. Moisture Control Humidity's the sneaky villain here. It messes with powder and film, making prints unpredictable. Store everything somewhere dry. Silica packs are best for this purpose. 37. Washing Instructions Want those prints to last? Flip garments inside out, wash in cold water, skip the bleach, and keep the dryer on low. Proper care = prints that don’t look like they went through a war. 38. Quality Control Inspect every print thoroughly before and after pressing. Smudges, crooked designs, patchy ink—catch ‘em before shipping. Double-check everything before shipping. 39. Pressure Setting Pressure setting defines the print quality. Check for optimal pressure, typically around 25-35 PSI (1.7-2.4 kg/cm²). 40. Consistency The not-so-secret ingredient to nailing DTF printing every single time. Use settings that work, stick with good materials, and keep up with maintenance. Why Choose Music City DTF For DTF Printing Materials? Music City DTF is the perfect first stop, whether you are in Nashville or its surrounding neighborhoods. With top-quality DTF printing supplies, novice-friendly kits, and expert assistance, Music City DTF makes it easy to start in this business without any hefty upfront cost. We streamline the process from setup and instruction to dependable supplies and flawless production success, for entrepreneurs who are scaling or just getting started. Final Thoughts Starting your printing journey is much easier when you understand the basics, and that begins with the correct vocabulary. This DTF printing glossary covers the fundamental terms and DTF printing tips that can help you get started without a hassle. With these definitions at your fingertips, you’ll avoid costly mistakes, improve your technique, and go to market faster. If you’re in Nashville, Music City DTF is your go-to resource for quality products, knowledgeable support, and everything you need to thrive in the custom DTF printing industry. New to DTF printing? Start with the Music City DTF sample pack and try DTF printing for your business today!
Learn more
Valentine's Day DTF Transfers: Valentine’s Day Shirt Ideas with DTF Printing
Valentine's Day inspires creativity, emotion, and a desire to express affection in unique and individual ways. Custom clothing has become a trendy present and style statement, even though chocolates and flowers never go out of style. If you are looking to build something special this February, then try Valentine's Day DTF Transfers to do something different. Printing via Direct-to-Film (DTF) technology turns plain t-shirts into vibrant love canvases. DTF transfers for Valentine's shirts can effectively convey the spirit of Valentine's Day with clarity, color, and durable quality when paired with the right designs and creative direction. Let's explore some creative themes and eye-catching images for Valentine's Day custom shirts that you can produce using DTF transfers. Why Choose Valentine's Day DTF Transfers? Sharp, finely detailed images in bright colors are produced using DTF printing. It readily adheres to cotton, polyester, and mixed fabrics. Whether you run a modest apparel company, craft your tees at home, or design for clients, DTF gives you the flexibility to produce custom shirts in small or large batches. You avoid the mess of screen printing and the limits of HTV (heat transfer vinyl) by using Valentine's Day shirt printing techniques like DTF. With a heat press, you can quickly apply them and achieve a smooth, expert finish every time. Elements for Must-Have DTF Valentine Design 1. Hearts in Every Guise Hearts never age. Go beyond the basic shape and experiment with changes: Add glitter or gradient fills to retro bubble hearts. Employ floral patterns with stitched borders and a quilted appearance. Include humorous, comic-style fractures for anti-Valentine's Day or satire. These heart patterns work on both alternative and romantic tees. 2. Rose and Flower Any shirt benefits from floral patterns. Roses, tulips, and peonies in delicate pastels or strong outlines create various atmospheres: For a vintage vibe, combine full-bloomed roses with moving vines. Poetic tees include little bouquets paired with cursive love letters. Behind names or initials for couples' shirts, layer flowers. Enhancement of visual appeal in the DTF file comes from small sparkles or foil textures. 3. Sweet Shapes and Things Create a cheerful and celebratory environment by employing familiar symbols: Wax seals on love letters. Arrows from Cupid cut through candy hearts. Wine glasses, chocolate boxes, or lollipops. You can either arrange these shapes into heart shapes or design repeating patterns that enclose sleeves or shoulders. Suggestions for Shirts According to Connection Types A. Couples Shirts Celebrate love with romantic t-shirt designs for couples: On one shirt, "Better Half," and on the other, "Other Half." Heart-shaped puzzle components. Coordinated prints: moon and stars, sun and cloud, coffee and donut. Depending on the couple's style, it can be either minimalist or maximalist, featuring clean linework or bold pop art. Personalization can also be achieved with initials or significant dates. B. Tees for Galentine's Day Soft pastels, clever phrases, and complementary designs help one create female friendships: Sisters Before Misters Heart-shaped sunglasses and retro lipstick symbols Champagne bottles and disco balls Appeal to a younger, fashion-conscious audience using metallic accents and fashionable typefaces. C. Single and Enjoying It Some would rather sass than sentiment. Lean toward humorous or sardonic designs: "Love stinks (and so does you)" Include Individualization in Your DTF Designs Include names, initials, or dates to turn simple designs into keepsakes. A personalized DTF transfer for Valentine's shirts turns a lovely picture into a unique present. Give: Monograms within flowered wreaths Names of couples under drawn portraits Dates with hand-drawn calendars and red hearts You can create a few basic layouts, then add unique features as orders start to come in. DTF is an excellent option for made-to-order shirts due to its adaptability. 2025 Valentine's Day Shirt Design Trends Designs change; Valentine's Day shirt design trends 2025 add fresh vitality to Valentine’s ideas. To keep ahead, follow what’s new and what’s in. Popular Hues Warm corals and deep burgundy replace vivid reds. Soft tones, including muted lavender and dusky pink, distinguish Galentine's and minimalist designs. Iridescent pastels: Employ gradient combinations for a dreamy, digital quality. Popular Fonts Handwritten scripts with unbalanced baselines Three-dimensional shading in bubble letters Art Deco-style typography for vintage love Motifs Now Trending 8-bit pixel hearts for gamer couples Rose and dagger tattoo style Celestial themes: moons, stars, constellations with romantic meanings Include these features in your DTF transfers to match the current season's trends. Expand with DIY and Ready-Made Kits DIY Valentine's Day t-shirt designs can be sold as part of kits by craft stores and small enterprises. Provide a package including: Blank shirt Preprinted DTF transfer Direction and heat Make it Valentine-ready by adding gift wrap or labels. Craft parties or family projects benefit significantly from these sets. Make Custom Shirts for Valentine's Day Selling Valentine's Day custom shirts DTF transfers as a service will help apparel decorators and print businesses increase revenues. Create a mini-catalog of designs, allowing clients to select their shirt size and color, and then press the transfers onsite or for pickup. Early in February, launch social media specials. Suggest friends groups or couples to coordinate matching shirts for Valentine's dinners, bowling nights, or themed parties. Exhibit the designs using styled mockups. Upsell and Bundle for Increased Profit Boost your Valentine's Day profits by offering matching accessories, such as tote bags, baby onesies, or hats. Coordinate DTF transfers on: "Love in the Air" canvas bags Infant bodysuits bearing the message "Mommy's Valentine" Heart mandala pillows These additional products enhance your brand's holiday offerings and encourage the use of themed gift baskets. Final Thoughts Valentine's Day presents a great chance to design and market fashionable, significant custom clothing. DTF printing allows you to create color-rich, long-lasting, and on-trend designs with minimal setup, whether you're designing shirts for romantic partners, close friends, or singles with a sense of humor. Experiment with tiered textures, strong symbolism, and sincere customization during this holiday. Your designs can show love on cotton, from Valentine's Day personalized DTF transfers to unusual do-it-yourself kits. Skip the mass-produced graphics in 2025 and embrace the human element. With DTF printing, you have complete control and can provide something truly unique. Tap into the demand for Valentine's Day custom shirts, and you'll find not just clients but also fans who honor love in their unique way. Ready to design? Check out our DTF Gang Sheet Builder to start creating multiple designs at once!
Learn more